Plumber Tips and Tricks
We will try to help you understand which solution will be more suitable for your plumbing – repair or replacement, Our plumbers will give you some advice and some very useful information. We are going to give some great tips that can help you with many issues that may arise in the future. Some great tips from our experienced techs and some good trade secrets that you probably would not hear anywhere else.
Academy Disc Plumbing & Repair
Address: 89 N Robinson Ave, Oklahoma City, OK, 73102
Phone: (405) 421-0102
Here is how to decide whether you need a repair or a replacement
- If the cost of the repair is nearly the same or higher than the price of the replacement Our tech will let you know.
- The plumbing system part or pipe to be repaired gets frequently broken, replace it with a new one. If, on the other hand, you have this problem for the first time, you can try repairing it to see whether it will function well or call us.
- If you that tried to repair the equipment and it was damaged or is too old, You would be better off getting it replaced. You are probably not going to find any spare parts for a repair now or in the future anyway.
- If you can buy water-saving products at an lower price, purchase them and replace the old environmentally-unfriendly ones. Our techs can install them for you.
Which are the most common Oklahoma city problems and how to solve them with or without help from a plumber?
COMMON REPAIR ITEMS
- Leak Locations
- Water heaters
- Broken ball valves
- Drain cleaning
- Garbage disposals
COMMON REPLACEMENT ITEMS
- Recurrent toilet clogs
- Broken old pipes or leaky pipes
- Cracked toilet porcelain
- Broken shower heads
- Lead pipes, If you have them in your home it is hazardous for the quality of water that your family consumes, so you need to get them replaced by a tech immediately. Also asbestos. It is very dangerous to have in your home and needs to be removed immediately.
As for the best solutions for these problems, you can always contact us at 405-421-0102 and get their advice for free. We that are on staff will be happy to consult with you anytime so that you can make up your mind on whether you will need some expert help from a tech or you will be able to fully deal with the issues yourself. You can also call us whenever you need emergency tips or services that are beyond you scope of understanding.
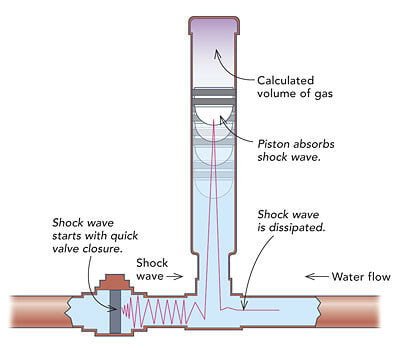
Repairing Water Hammer
Explanation
It will happen when you don’t do anything more than quickly shut off a kitchen, lavatory or tub faucet. BAM YOU Get A Water hammer. It will sound like a large shock wave went though your pipes! Well, in fact that is just what happened. A water hammer can and will damage your pipes.
A shock wave that was created “water hammer” is moving along at thousands of feet per second and can exert pressures of hundreds of pounds per inch.
Well, just what is a water hammer? Let’s look at what is and see how to repair it. A water Hammer
The plumbing Codes will outline the most up to date and most modern method that will used in installations. Since it is installed in a Commercial or residential building is part of the water and sewage disposal systems, it’s always of vital importance that the installation should not be left up to the discretion of irresponsible or an unlicensed copntractor. To insure and maintain protection of public health and safety and it must be enforced by code enforcement.
The sanitation code should not be mistaken for the plumber’s code. On the contrary it is Rules and Regulations regulated by the cities, counties and states for anyone who is installing drinking water, sewer or water closet installation in any homes, factories, offices, hospitals and schools. It doesn’t matter who is doing the installation, the City codes do require that it be performed in a specific, safe manner. It was found that the failure to do so can cause widespread disease, which will be devastating to the population.
Licensing for Plumbers
The apprentices have to demonstrate their ability as installersto the Construction Industries Board before being issued a license. Theplumbing code, even if it is technically perfect becomes valueless if its provisions are not inspected and enforced. By issuing a license specifies that the plumber is qualified in both theory and practically. That their technical knowledge is sufficient to maintain the standards of the code for..
The license is not intended to prevent anyone but an contractor from doing sanitation work? Licensing will prohibit irresponsible, incapable persons from endangering the health of the residents. Any person can do the work if they have sufficient knowledge to do it safely, as long as the Rules and Regulations of the Construction Industries Board code are observed and or local City. Those that wish to do the installation work will be required to demonstrate their ability’s by applying for a license and passing the exam.

How to add a Saddle Valve for a new water supply line
The saddle valves are a very quick and easy way to add a new water supply line without having to solder, glue, or screw on the new valves or tees. Most of the saddle valves will work on copper, aluminum, brass, or pex tubing. The saddle valve can also be used for a wide variety of applications for plumbing such as for the larger water pipes and for some for drain lines. The saddle valves will most usually fit pipes from 3/8 in to 1 in copper or pex sizes which will cover what the most homeowners have. There might be a need for a saddle valve when adding a water line for the refrigerator ice maker or, a swamp-cooler, water dispenser or humidifier. We will show you how to install the saddle valve for a smaller 1/4” water line also.
- First you have to locate a section of the water supply line that is round and not dented. Also making sure it will have enough room so the saddle valve will fit. You can not use a spot where there is any solder, glue or that is too close to another fitting to make sure that it doesn’t hinder the saddle connection.
- be sure to apply pipe dope or Teflon tape to the threads of the 1/4 in valve then screw it into the metal bracket. Be sure to use pliers to hold the bracket while you screw the valve into its position. It will be a lot easier to do this before you install the bracket onto the pipe.
- Now you will position the rubber gasket on the valves bracket to make sure it is centered and in the right place. Now set the valve brackets on the pipe and make sure that your location that you chose will also allow you to tighten the 1/4 in supply line on to the valve and it gives you enough space to turn the valve on and off.
- Start both of the mounting screws. The screws will be started from the top bracket where the valve is and thread into the bottom bracket. Be sire to tightening them evenly on both sides and making sure that the rubber gasket will remain centered under the valve. The you can tighten the bolts until they are good and snug so you can’t wiggle the saddle at all.
- Now you can connect the new water line to the saddle valve. Be sure to hold the valve with pliers while your tightening the water line and make sure you don’t move the saddle valve. You can now connect the supply line and test for water leaks if you are in a hurry but it is also good idea to run water through the line and flush it out before you connect it.
- Now you must tighten the self piercing valve until it bottoms out. That will drill a hole into the water supply line. Then once it is turned all the way in and bottomed out you slowly open it and allow the water to pressure up. Now you can flush the 1/4 in water line out. Then turn the saddle valve off by screwing it all the way down.
- Now you can finish by connecting the other end and then turning the valve on to check for water leaks. Be sure to check it a few time during the day and then the next day to insure there are no leaks and if you need help from we will send one of our techs right out.

Water pressure
You can be sure that you won’t hear this from your customer. I have to much water pressure. When I take a shower it peals my skin off or it is taking to paint off the wall. It is just way to much water pressure. Most customers will want as high of water pressure as their fixtures will produce. Most customers say that they do not have enough water pressure from the get go.
Why do you think the customer would ever ask for a pressure reducing valve installed in their house? There are several reasons why you might want to install a pressure reducing valve.
Your Appliances
When you start replacing the appliances in your house you come to find out they are not very reasonable at all. It true fact they are down right expensive and very costly. Yep, they are not cheap at all. Especially if your wanting to get a pretty descent product that should last a long time hopefully. If I’m investing this huge amount of money in my house and appliances, I, for sure will want to protect that huge investment in absolutely every way that I can.
When you have water pressure in your house that is way to high that extra water pressure will put a lot unnecessary wear and tear on your new dishwasher and other appliances. You will really lower the life of the appliance and in the long run it is not really worth it, The other appliances that run on water will also be greatly effected and it will also diminish their life span immensely. I see a lot of costumers that like the much more expensive appliances like Subzero. I would not be able to sleep at night after spend thousands of dollars remodeling my house only to find out the water pressure is destroying all of my new equipment.
Your Shower
Yep, No one wants to shower with the water pressure that is just dribbling out and is not sufficient to cover you completely with water. You will have to find a happy medium between the water that you use and the money you end up spending. If you try to reduce the water pressure it will make your fixtures last a lot longer and save you money in the long run. You don’t have to compromise or just settle on for the low water pressure. You can have really good water pressure that won’t damage your plumbing fixtures and will still be comfortable.
Not only will you be helping to reduce damage and saving money on your water bill. You will be helping the environment by saving water also.
Water supplies
In different parts of town the City is always upgrading their water mains and installing new ones (They need to, the old ones are made out of lead and you know as well as I do lead is not good for us or the environment) and some times the new city main will produce up to 115 psi and that causes major problems for the contractors. There is a lot of us installing the pressure reducing valves for our customers. As you would suspect this high pressure can also cause havoc with the water supply lines through out your home.
Now with that example you have to start think about that much water pressure going through your washing machine hoses. They are made of rubber and will not stand up very well to that kind of water pressure. It is just a catastrophe waiting to happen. In fact the washing machine hose is one of the most common causes of a house flood. Your best bet is to install new braided washing machine lines they are much stronger and will last a whole lot longer because they have metal braiding on the outside of the rubber hoses. They are a way better product, stronger, last longer and just a little more expensive.
Most of all the customers will believe that they can tell if their water pressure is way high, way low, or maybe it is about right but it would be a good idea to get your local company to check it out and make sure it is what you need. He will give you peace of mind in knowing whether or not your doing the utmost to protect your house and all of your belongings. Now at the other end of the spectrum. If your water pressure is to low our we can help you also.

Emergency water shut offs
Your straight Stops
Your straight stop valves are usually used if the water supply lines are coming from under the crawl space up through the floor or cabinet and the water line goes up through from the supply outlet. Your straight stop handle for the valve will come straight out in the center so that it is easy to reach.
Your angle Stops
Your angle stop valves will be used if the supply lines are coming from the wall and the outgoing side will turn at a 90 degree angle to the incoming side. Your handle for the angle stop will be at a parallel from the wall and it will usually faces the front or to the side so you can reach it easily.
Your 3 Way Stops
Your 3 way stops will have 1 inlet and 2 outlets. You will see these installed at the kitchen sinks to serve the hot supply for the faucet and the dishwasher also. Your 3 way stops can be found in a variety of angles and configurations.
Your compression Stops
Your compression stops are usually used when working with copper water pipping. These stops compress the brass feral around the copper pipping with a locking nut to hold it tight on to the supply line and the valve. Compression stops can be attached with crescent wrenches or water pump pliers. You can change these type of stops but you can not remove the nut and feral once it has been compressed, however there is a special tool to remove these.
Your copper Sweat on Stops
With this type of stop you will need to solder it onto the copper piping. You will also need a torch. Solder and flux. Sand cloth, wire brush and a good knowledge of soldering and lots of practice. If you don’t get a good solder joint it could pop off. Usually when your not home and flood your house. These sweat stops also cannot be removed unless you unsolder them.
Your iron Pipe Stops
Your iron angle stops will be threaded on to your galvanized pipes. They are most commonly used on your brass or galvanized piping, although they can be used on most any type of pipe by using a male adapter. The male adapter is installed on the piping and then the stop will thread on to the male adapter. This usually a very reliable connection and it can be changed relatively easy. You can easily install these with a crescent wrench or water pump pliers.
Your cpvc Stops
The cpvc stop will have a cpvc insert ball valve and like a coupling it is glued to cpvc piping, A nut and a gasket will screw to the stop.These are fairly easy to install with pliers and some cpvc glue. After gluing the stop on to the cpvc insert you will be able to unscrew the gasket and nut if you need to ever replace the stop in the future
Your pex Stops
Your stop used for pex will be ribbed for the pex pipes so the clamps will not slide off. These stops work with the ring clamps or pincher clamps. pex tools will have to be used for this type of stop, it will most often be the faster and most reasonable way to install these if you already know how to use the tool for pex clamps or pincher rings. Your pex stop are easily removed but you will have to cut off the ring. This will usually cut into the pex pipe unless you use a ring buster. They will not work on the stainless steal ring though.
Your shark bite Fittings
You can use the shark bite stops that are easier to install if as there’s enough piping coming out of the wall. Your shark bite stops will push onto the piping, they will lock in and seal with an o ring and stay clamped on with a barbed type of connection that wont let the pipe slide out. Your push type of shark bite stops are used for pex, cpvc, copper and polybutylene piping because they all have the same diameter. These can also be easily removed and replaced.

If Your Probe Is Dirty
When your first waking up in the morning and taking a hot shower it would be a luxury to most of us. Something we can really enjoy and appreciate. But when you have an old water heater, it won’t necessarily be the hot shower you were looking forward to then sometimes it will be way to hot and most of our customers will believe their water heaters are worn out or it is time to purchase a new water heater. Most of the time this is far from the real truth of the matter. The real truth is that you will have to go through some risk to get to the heart of the problem. There can be several contributing factors that are causing the fluctuation of the temperature and they both will have the evidence of completely different symptoms. If your water is hot but it does not last for very long the problem could very well be your cold water inlet dip tube. When the cold water inlet receives water in through the dip tube it will continue down the dip tube to the very bottom of the water heater. This causes the incoming cold water to go straight to the bottom where the burner is. If your dip tube degrades and comes apart they do this when they are very old. Instead it goes in the top of the tank. Even though the water heater is full of hot water it will just travel across the top of the tank and come out the hot water outlet. It will be lukewarm at best. Even though the water heater is completely full of hot water. Now if you are having problems with the water always being a different temperature and the temperature is always colder when you haven’t been using it much. Then when you start using the hot water and the temperature starts to get hotter. This usually will mean that your hard water is leaving heavy deposits on the water heater probe. The gas water heaters have a probe that extends into the tank. This is the thermometer for the water heater so it can tell how hot or cold the water is and know when to turn on or off. If your probe gets heavy deposits building up on it, it can not detect the temperature correctly and will result in the fluctuation of the water temperature. If your tank is not being used, the water will slowly cool but the probe will not detect this as quickly as it should. This will result in the first time it is being used after sitting idle the water will be lukewarm. This will also happen if you are not home for a while. if you turn the water on it sends it straight to the bottom and it will cause the probe to cool and light the burner. Then when you use it for the first time the water is not hot but as more water is used the water will heat up and it seams like it is working again This is when it starts to get frustrating. When the probe tells the water heater to turn on, the probe is still not working correctly and the water being heated can become way to hot. This can cause the T and P valve to open and do its safety feature and relieve some of the pressure building up inside of the tank. When you are having different temperatures of water coming out of the tank a lot of people will turn up the tank. This will cause more problems or cause a dangerous situation and can compound the problem. That is when you should call one us to repair the issue with the water heater. At this point you will need to access the situation with the company and decide if you water heater is to old to put money into the problem or if you need to have your plumbers replace the old worn out tank. It could add to your expenses if you were to have someone replace the gas valve and have the water heater go completely out after spending money on the old tank. If your water heater is really old It is more then likely worth going ahead and buying a new one. When they are that old it is not worth trying to save money when it could go out and flood your house.